skip to main |
skip to sidebar
 Monday, Jan 11It's time to tape and mud the drywall. Taping is easy; So is slapping joint compound (mud) onto the drywall seams. The challenge is doing it correctly. Getting a nice smooth seam takes a little skill--skill that we don't quite have yet. This will take a while...We are also able to prep the copper tubes for the shower, we cut the pieces to length, but we are going to save the actual installation until the tile is sealed, grouted and the grout sealed, too. We want to install the shower in one shot and leave it up on the wall when the time is right.Three of our floor tiles came loose (hopefully it will remain at a count of three), so we have to mix up more thinset and stick them back down. No big deal, but another hassle.Now, we need to wait for tomorrow to sand down the mud to get smooth joints. Two or three mudding and sanding stages are anticipated to get a final smooth wall.Tuesday, Jan 12We apply and sand the second coat of mud and spot some some pretty rough-looking seams. We'll fix that on the third coat. Sanding creates a ton of dust, and doing anything on the ceiling makes for sore and tired arms. Not much else to say...Wednesday Jan 13More sanding and mudding-- not there yet. the seams still need some work.Also, the carpenters stop by to fix the window sill that got torn up pretty badly during demo. We'll finish up the trim later. Overall, we are happy the bath is closed up and looking like a bath, just need to finish up these walls and tile so we can wrap up the installation.
So, we are at another weekend, and it is time to crank out the rest of these tiles. I think my sense of humor is starting to wane; just get this done already! Ugh.
Saturday January 9:
Of course, we can't just wake up and start tiling; there are more things to do. So, we do another pilgrimage to Home Depot and pick up some more thinset. I head out to the tile store to pick up three more tiles because we are coming up a bit short. On the same trip I am able to pick up our special-order sconces. The sconces are totally awesome. I just hope they look as good once up on the wall. While I do the errands Jake is continuing with the tiling of the bath walls. At the edges (transitions from tile to drywall) we have to worry about how it will work with our window casings and also how to do a tiny little strip of tile down the sides of the tub. Jake has done all the engineering to plan out what needs to be cut and is ready to roll when I get back.
** Slight Interjection - Jake got a  great candid of our pooches in the back yard. I think the caption of this pic would be "Yeah, I agree Wiley, our owners are nuts." **
Now it is 3PM, where did Saturday go, Geesh!! We start by putting in the floor tile next to the tub so we can install vertical transition tiles from the floor up (using that wonder of gravity to our benefit this time... see prior posting). Tiny tiles go up, then we round the corner, up up up and we are moving along nicely. But we have to stop because we have to drill holes in two tiles for the shower sprayer mount and the towel rack.
Tired and hungry we stop for the day since out thinset is turning into a brick. Sunday January 10: Now I am on a mission! I will not sleep until the last tile is place. It is now my personal medieval crusade. Take heed tiles and thinset, ye shall succumb to thine fates on this good day! But first, make some coffee...
Jake begins drilling the holes for the brushed nickel accoutrements which is a very slow and precise task. We get that done, and up up up, the tiles for the alcove are done. I beseech you, raise your goblets high and give a hearty cheer, for the alcove is done!
 Now we move on to the floor. The first run of tile goes down quick and easy, but then we hit the dreaded toilet hole. This one is tricky because it has to be a big enough hole to fit the toilet hole thingy but small enough that the toilet hole thingy's edge sits on the tile. (Jake says it is called a "Closet Flange" but to me, it is a toilet hole thingy).After staring at this for about 10 minutes, we say "A pox upon thee, toilet hole thingy!" and decide to eat something.
After stuffing some pizza in our faces we are back on the task, and Jake figures it out pretty quickly. We get those two tiles in place, and then it is a race against the clock. Bad news, the thinset is getting thicker... "and Leon's getting laaaaaarger!" (please tell me if you get that reference?)
Plop, scrape, chop, place, smush, repeat, we are brave tiling warriors. We are now down to 6 tiles left and the thinset is vexing us. But, NAY! We do not cower to thick-set. NAY I SAY!!!
Medieval curses follow:
May thou hammer be brittle!May thou plow seize!
May thou cup be as unto a sieve! May thou pigs be set upon by ravens and torne asunder leaving only bespecked bone and curdled fat for which the rats upon to feast!We shall triumph on this good day!!!!! It is now 10PM, the last tile is done. Crusade complete. Huzzah!

Wow, it really is starting to look like a bathroom now. Although we didn't get the tile in over the weekend as we hoped, we have made some substantial progress since out last post. Here is what we've been up to.
December 31:
Our genius move to have the contractors put up the sheetrock in the bathroom is underway. This is going to save us time but most importantly, it is going to save my back a lot of aches and pains. In time for the year end, we are all set with real walls in the bathroom.

Time to pop some bubbly and celebrate the new year.
January 1:
We are going to take it a little easy today and work on all the prep steps before tiling. First is to fasten the underlayment to the subfloor. After a gabillion stripped screws and two chewed up bits, the underlayment is now down and isn't going anywhere again, ever. It took a while but it is done.
Time to prep the walls for waterproofing but we realize that everything we need is out in the freezing cold and needs to warm up before we can move on to the next step. 
I think its time to stop and start tomorrow fresh. Time for a spell of Legos Indiana Jones II on the XBOX
January 2:
Okay, so now we are going to prep the walls and floor with the waterproofing materials. This stuff is supposed to be the bee's knees and help us make sure we have no future water damage, etc. Some stuff from a company call Schluter with products called Kerdi and Ditra, it is made in Germany and "you know Germans make great stuff"... (a little homage to the Sham-wow guy in case you didn't catch the reference).
So, this should go pretty quickly. We mix up the thinset that we got from the tile guys and slap it on the walls, then we put up this Kerdi membrane. Piece of cake. Except, of course it isn't.
First, the tile guys gave us the wrong type of thinset. So, I am off to the Home Depot to get the right stuff. Back home and mixing thinset in 15 degrees with winds gusting is no picnic.
Time to get it on the walls. First part, a small pieces at the edge of the tub, done. No problem.
Next, a few small pieces down the side of the tub, done. No problem. Then the bigger pieces need to go in. The trick is to make sure you have nice moist thinset and that there are no air bubbles when we are done. The problem is that we have cement board which is very very thirsty and wants to dry out the thinset before we can get the wall covered and put the membrane on it. We double back and put more on, still drying out. Ugh. Turns out we should be wetting the cement board a bit more than we thought before slapping thinset all over it.
We finally stick up the membrane and start smoothing it out. Now we turn the corner and continue to the next wall. See previous paragraph. Finally get 2nd piece installed. We look back at the first piece and see there are bubbles. Ugh. Now we pull back the 1st piece to work out the bubbles but now the thinset is dry again and it wont stick. Repeat ad nauseam.
So much for getting this up quickly and tiling today. We are covered in thinset and only half done with the walls and it is 9PM. We gotta take a break and pick it up again in the morning.
January 3:Back to that darn Schluter stuff. How do you say curse words in German because I think I will need to know a few before the day is through? We need to mix up another batch of thinset and use our lesson's learned to complete the job.
Finally done at around dinner time, eat some  meatloaf and then tackle installing the Ditra on the floor. This means mixing yet another bucket of a different type of thinset which again, involves going out in the wonderful weather (notice the occasional wind gusts of 50 mph).
But, compared to the Kerdi, Ditra is a breeze.Got that all wrapped up and time to clean up our mess before bedtime.Here is the before and after of all the work we have done (yes we were messy, but at least we clean up nicely). 


Some more busy days, things are moving ahead quickly now. While I am off doing my commute to NYC, Jake has been busy busy busy. Here is his latest commentary...
Monday Dec 28th
The morning starts with hours of searching online for a laptop motherboard. How is a motherboard related to bathroom construction? It isn't. but for Christmas Eve, Jake's computer gave him a melted video card. That thing is not easy to find online.
With a good bit more work the ceiling is finally furred and level. The 1 1/4" drywall screws that we bought wont even touch the joists with all the shimming. Another trip to Home Depot to get longer screws. These 2 1/2" screws are going to be tough to screw in. It's 5pm and we can finally begin to put up the sheetrock ceiling.
Our drywall cutting technique hasn't been put to use for a couple of years, but there are vague recollections of it being a pain. It's 3 degrees F outside, so we're cutting this sheetrock inside in the entryway. It was actually not too bad, and we get a straight cut to go above the tub. We build a makeshift "T" out of spare lumber to assist in lifting the board, and put a cleat on the wall over the tub to hold it up while we put in the screws. Getting the sheetrock into the tub alcove and up to the ceiling (and over the window that is in the way) took a lot of strength. These screws are really hard to get in. Once the screws are mostly in, we call it a night. We'll tighten and counter-sink them tomorrow. We are tired.
Tuesday Dec 29
The carpenters are ready to put insulation in the garage in the  morning, and they notice that the existing telephone line is going to get crushed when the sheetrock goes up.
I am able to disconnect the phone line in a 2nd floor bedroom and drop it into the garage where it can be run through holes in the joists. Another leg has to be cut, run through the joists and spliced back together in the wall. I wonder if anybody will ever use them. Does anyone have a land line from the telco?
 I spend a couple of hours trying to get those sheetrock screws really tight. What a pain. Uh oh, the edge of the sheetrock is just short of reaching a joist; this looks wrong. I ask the carpenters who are working in the garage to give the issue a look. Yup, that's wrong. I appreciate their suggestion to cut the unsupported sheetrock at the joist and put up a 2x4 nailer to attach another sheet. It takes a little while to cut the board using a sheetrock keyhole saw, but it has to be done.
The contractor that's doing our garage stopped by and mentioned that his crew could sheetrock if we wanted them to (so we can make our timeline for tiling over the New Year's long weekend).The quote for the sheetrock job was pretty attractive given that this work is tiring and we are running out of time before the weekend. We hire the crew to finish up the sheetrock and cement board in the alcove. The carpenters notice a couple of rookie mistakes that we would have made if we hadn't brought them in. A few missing nailer boards would have made sheetrocking the closet an issue. Oh well, sometimes you just have to call in some help.
I finish the bathroom insulation in preparation for the crew tomorrow and we get all the measurements for the underlayment so we can cut out the jigsaw puzzle pieces tomorrow. Another long day.
Wednesday Dec 30
The carpenters continue putting up sheetrock in the garage, as I prepare for the carpenters to sheetrock the bathroom. The underlayment floor needs to be cut which is a little tricky but fits nicely, and the water service fittings for the vanity faucet and the toilet need to be screwed in since they poke through the sheetrock. They wiggle quite a bit, so some blocking goes in to stiffen them up. A few pieces of blocking remain to be nailed in to support the shower mounting and some towel bars.
By about 2pm the carpenters take over in the bathroom. Sue heads off shortly thereafter to rent the tile saw with the help of our friend Mike while I stay back and "supervise." By 4:30pm the saw is here, and we call it a night.
It's nice to have an 8 hour day. Stay tuned, we should have some great pictures by end of tomorrow...
Sunday Dec 27: 
How do you vent a bathroom fan? Just put in a dryer vent kit. A Pain in the Butt in Any Language.
Outside vent cover, check. Pest guard, check. Flexible duct, check. Now to put the thing together.
The first step involves bending a piece of sheet metal into a tube and slipping it into the vent cover. The issue is that it has to be a PERFECT circular tube or it won't fit. 45 minutes later, and we've got it. Now somebody's going to have to go cut a circular hole in the roof soffit that's 20 feet up. We get to use our nifty ladder to scale up the side of the house.
OK, ladders are hard. Jake goes up first to drill a hole in the soffit. Carrying a drill while trying to jockey up a springy metal ladder with one free hand is unsettling to say the least. A few butterflies in the stomach later, the pilot hole is drilled and Jake is back down to get the reciprocating saw. Jake goes up again, slightly faster this time.
This stupid reciprocating saw has a "safety" feature that you have to use both hands to push a button while pulling the trigger to use it. The ladder was scary enough holding on with one free hand. Look ma, no hands. Now the butterflies in the stomach are freaking out. Jake has to lean out to the side of the ladder, look up, and hold the saw in about every possible configuration to cut a circle-- right hand, left hand, thumb on the trigger, pinky on the trigger; you name it. The hole is finally done.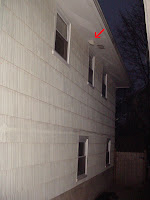 Let's be smart and attach the vent duct to the vent cover before we put it up through the soffit. Then, we can just pull the duct into the bathroom from inside. The duct seems to actually be smaller than the perfect round tube we made earlier. With a lot of elbow grease we finally get the duct attached and clamped on.
This time Sue goes up the ladder to screw the vent to the soffit. The "secret" is not to look down. Four dropped screws later, Sue is back on the ground, and we are both getting grumpy. Sue goes back up again with a whole box of screws, and finally the stupid thing is in place.
From inside, pulling the duct through the space in the roof is like pulling teeth. The tube is slightly smaller than the space it needs to pass through, and it is pretty rigid, which makes pulling 5 feet of little round steel wire ribs a real chore.
Fortunately, the fan unit is more forgiving, and attaching the duct to the fan goes pretty smoothly. Done. Now, we can finish up the ceiling insulation and move on to furring the ceiling to level it.
There is nothing pleasant (well actually the wall niche in the shower makes a pleasant step for straddling the tub) about leveling a ceiling. Our ceiling happens to be a good inch out of level and not even close to in-plane. Furring basically involves a lot of shimming, measuring for level, and repeating.
Hours later, part of the ceiling is prepped up, and it's getting late. Jake's legs are shaky from straddling the tub and he can't lift his arms anymore. A rough workday is over.
December 26:After enjoying a day of playing with toys and eating Chex Party Mix, we are back to work. We are now on to the task of insulating the ceiling and attic.This seems harmless enough, just throw some fuzzy stuff up there and call it a day. But that is what the formerly naive Sue thought. Now I am the old cranky crick-in-the-back-and-bruised-butt-and-knees Sue who knows better.I suit up into my bunny suit and climb into the attic. The attic above the bathroom and bedrooms is substantially smaller than the one over the living room. I have about 3 feet of clearance at the highest point and all sorts of A/C vents to get in the way.The first issue is that we don't get to just throw the stuff up there. We first need to put in baffles to ensure we get proper airflow or something like that. Another addition to my vocabulary. The baffles are just little Styrofoam ridged sheets that I am supposed to tack into the roof beams before I put in the insulation. Seems straightforward except they are thin Styrofoam so every time I try to attach them to the wall, the staples are going right through them. If I bump it, the staples go right through them. If I sneeze, the staples go right through them. There were quite a few inappropriate exclamations audible in the Collins home as I fought with these buggers.Here is what it looks like after I was half done: So, we proceed to get the full ceiling insulated with R30. The house is getting warmer by the second, I can just feel it. Jake feeds it up to me and I stuff it in place like a puzzle. If you never have dealt with insulation before, it looks all cushy and fluffy but in reality it is itchy nasty miserable stuff.As we are wrapping up the 2nd bedroom part of the attic I notice
  signs that we probably had a little woodland critter living in the attic at one point in time. They relocated a bunch of the insulation into the back corner. So now I am freaking out waiting for some rabid ferocious monster to attack. But, alas, I think our visitor has moved out already. So, I throw the insulation on top of their fluffy bed and get the heck out of there (notice the bed in the back corner of this picture?)That should be all I needed to do, right... wrong. We have extra insulation and we know that the attic space over the living room only has a thin layer of insulation on it currently. So, up I crawl to the other side and throw in a bunch more itchy nasty miserable stuff. Attic Insulation - DONE. May I never have to go back up there again.


